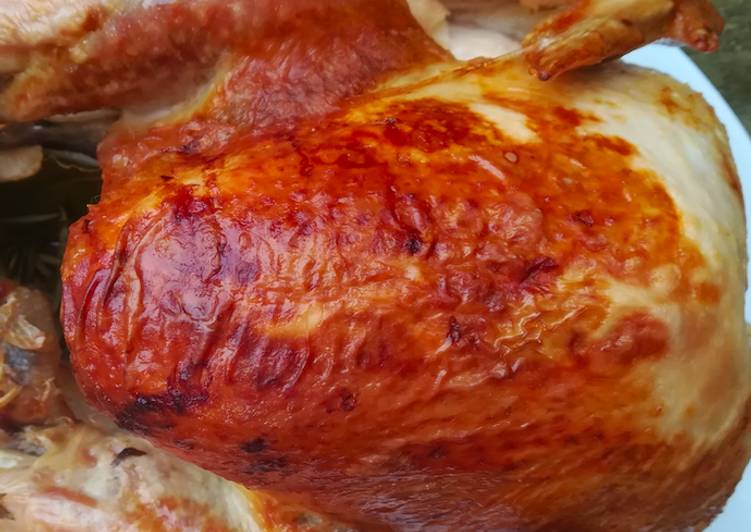
Hello everybody, I hope you are having an incredible day today. Today, we’re going to make a distinctive dish, dry brined roasted turkey. It is one of my favorites. For mine, I will make it a bit tasty. This is gonna smell and look delicious.
Dry brined Roasted Turkey is one of the most popular of current trending meals on earth. It’s enjoyed by millions every day. It is easy, it’s quick, it tastes yummy. Dry brined Roasted Turkey is something which I’ve loved my entire life. They’re nice and they look fantastic.
Essential Tips for Roasting a Dry Brined Turkey. Set your oven rack in the bottom third of the oven. Dry-brining the turkey—that is, sprinkling it with salt and refrigerating it uncovered overnight—gives all the flavor of wet-brining, minus the big, awkward bucket of salt water.
To get started with this recipe, we must prepare a few components. You can have dry brined roasted turkey using 12 ingredients and 12 steps. Here is how you cook it.
The ingredients needed to make Dry brined Roasted Turkey:
- Prepare 1 x whole 4 k bronze turkey
- Get 1.5 tbsp sea or kosher salt
- Take 0.5 tsp dried thyme
- Get 0.5 tsp black pepper
- Prepare 100 g unsalted butter
- Get 1 bulb of garlic
- Prepare herbs for cavity, bay, rosemary, sage, thyme and parsley
- Make ready For the vegetable trivet
- Get 2 large or 3 medium onion
- Prepare 2 x sticks of celery
- Make ready a few carrots
- Prepare 1.5 leeks
A dry brine, also called pre-salting, seasons the turkey like a more traditional wet brine, but it does not use any water. Instead, a dry brine involves rubbing Once your turkey is brined, you can choose whatever method you like for cooking it: traditional oven-roasting, deep-frying, or even grilling are all. Rinse inside and outside of turkey, and pat dry with paper towels. You can even dry brine a frozen turkey.
Instructions to make Dry brined Roasted Turkey:
- Use kitchen paper to dry the entire surface top and bottom, then sprinkle over the brine mix (salt, dry thyme and pepper) and massage it into all nooks and crannies (meaning under the wings, between the leg and breast and even inside the cavity.
- Refrigerate the bird for a minimum of 24 hours maximum 48 hours, uncovered. This is to allow time for the salt to penetrate and for the skin to dry, which will make it more crispy. Chop up the vegetables roughly, make sure you wash the leeks thoroughly. Arrange the veg in a roasting tray for the turkey to sit on.
- Chop up the turkey neck and other giblets if you like the offal (not awful) flavours and add to the veg trivet, stuff the herbs inside the turkey cavity half the garlic and put half inside the cavity and the other half with the veg. Now thoroughly rub the soft butter into the surface of the turkey, get between the wings and legs but most of it one the breast as they dry out more when roasting.
- Leave the turkey at room temp for at least 1 hour before transferring to a pre heated over to 180c 356f for approx 90 mins Check after 1 hour and cover with tin foil if it is already a lovely deep golden brown. Probe with a thermometer into the thickest part of the breast and make sure it reaches 70c, now leave it for about 10 minutes to allow some of the resting juices to run out. transfer to a plate but let those juices run into the veg base for gravy making. cover with foil and a tea towel
- Leave the turkey to rest for a minimum of 1 hour, don't worry about keeping it hot the gravy will be boiling, remove the towel and transfer any more resting juices to the gravy pot. now remove the skin at the neck end to access the wish bone.
- Use a small knife to cut either side of the wishbone then when you can access it use your fingers to ease it out, extra points and a wish if you keep it in one piece. Removing it will give easier access to more of the meat on the carcass, its not essential but you will be pleased that you didn't skip this part.
- Remove half of the wings by cutting to the joint then dislocate and remove, its a bit gross but you'll be fine. This gives better access to remove the legs so look for the pint where the thigh meets breast and just cut carefully throughout the skin.
- Turn the turkey onto its side where you can slice against the carcass and try to get the oyster which is a bit like your love handle and juicyist part. once you reach the socket that joins the leg to the carcass dislocate again with your hands then follow the line with your knife to remove the leg, repeat with the other leg.
- Now remove the breast but cutting just slightly to one side of the breast bone and follow the curved carcass until you reach the wing socket. As before use dislocation to open the socket then just follow the line with your knife. Repeat with the other breast.
- I like to remove the rest of the wing at this stage, just find the point closest to the wing socket and cut around it. If you like you can take time to pick all of this meat off but I do that after dinner and use this meat for sandwiches. Now separate the thighs and drumstick again cut to the socket then use dislocation to help you cut through.In this whole process you shouldn't have had to cut bone.
- Carve the breast about 1 inch thick slices and arrange neatly on a platter or tray or plate, keeping it nicely together, now remove the thigh bones by carefully cutting either side of it then underneath it, also make sure to remove any cartilage or gristle as that it horrible to eat, then carve the now boneless thigh and add to the platter.
- Now to keep the meat nice and moist ladle over some gravy before taking to the table, or an alternative in the next image is to plate up restaurant style, up to you? check out the video if you like. https://www.youtube.com/watch?v=_FBK5iL9Ktk&t=229s
I also added an extra step in this Dry Brined Herb Butter Roasted Turkey Recipe, which helps with crispy skin. Dry brined roast turkey is my new and forever method of cooking a turkey. Dry brining will give you the most phenomenally moist, tender, deep flavor-filled turkey. Flavored all the way through the meat. I was tired of filling a large bucket with a brining solution, making room in the fridge, and.
So that’s going to wrap this up with this special food dry brined roasted turkey recipe. Thank you very much for reading. I’m sure that you will make this at home. There’s gonna be more interesting food at home recipes coming up. Remember to save this page on your browser, and share it to your family, colleague and friends. Thank you for reading. Go on get cooking!