Hello everybody, it’s Brad, welcome to my recipe page. Today, we’re going to make a distinctive dish, better than salt dough holiday ornament clay. One of my favorites food recipes. For mine, I am going to make it a bit unique. This is gonna smell and look delicious.
Better than Salt Dough Holiday Ornament Clay is one of the most popular of recent trending meals on earth. It is simple, it’s quick, it tastes delicious. It is enjoyed by millions every day. They are nice and they look fantastic. Better than Salt Dough Holiday Ornament Clay is something which I’ve loved my whole life.
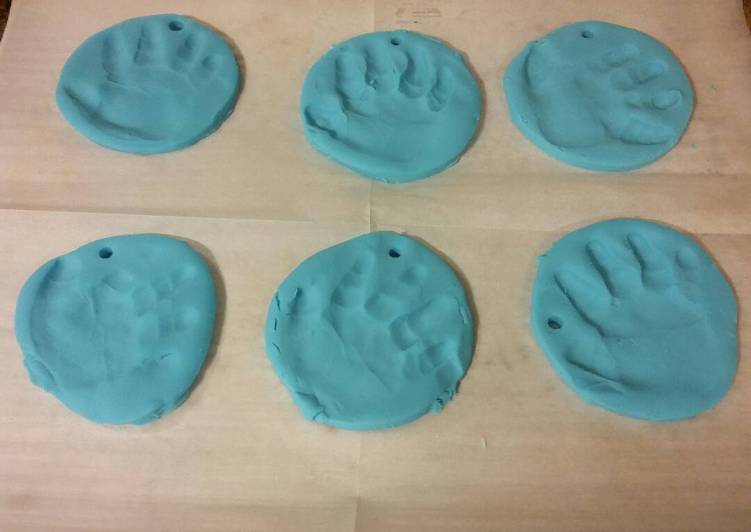
Great recipe for Better than Salt Dough Holiday Ornament Clay. Non-edible recipe for making ornaments for holidays or any other variety of craft for any occasion. Not gonna take credit for the original recipe.
To begin with this recipe, we have to prepare a few ingredients. You can have better than salt dough holiday ornament clay using 4 ingredients and 10 steps. Here is how you cook that.
The ingredients needed to make Better than Salt Dough Holiday Ornament Clay:
- Get 1 cup baking soda
- Prepare 1/2 cup cornstarch - lightly packed
- Take 3/4 cup water
- Make ready Optional - gel food coloring and/or glitter
Comparisons of baking soda clay vs glue and cornstarch clay, with tips and tricks on how to make strong and durable air dry clay!. I am currently addicted to homemade air dry clay! It is such a fun crafting material (even better than salt dough!) for kids and adults. How to make salt dough or air dry clay ornaments and a lighted star Christmas garland using easy and fun techniques with cookie cutters and custom paper templates.
Steps to make Better than Salt Dough Holiday Ornament Clay:
- In a medium saucepan over medium-low heat use a rubber spatula/scraper to stir together baking soda, cornstarch, and water until combined.
- Heat until consistency resembles thin mashed potatoes, stirring constantly. Remove from heat and continue stirring until consistency is like a soft putty.
- Transfer mixture to a medium sized mixing bowl. Cover directly with plastic wrap. Let sit until completely cooled.
- Once cooled turn clay out onto a smooth surface and knead until smooth. Add additional cornstarch if clay is too sticky/wet.
- Preheat oven to 200°F. Line a baking sheet with parchment paper. Roll out dough to 1/4" thick. Use cookie cutters to make desired shapes.
- Place pieces on baking sheet, poke a hole in the top of each piece with a skewer or drinking straw so you can thread ribbon/string through for hanging when done.
- Bake in oven until pieces are dry and hardened, usually takes about 1 hr at 1/4" thick. Be sure to flip pieces over halfway through baking for even drying.
- Let cool completely on baking sheet. Decorate as desired.
- See note below ⤵
- Note: To make ornaments colored before baking add desired amount of food coloring (in any color you want) to water before mixing with baking sold and cornstarch. To make glittery ornaments, add glitter while kneading.
Plus helpful tips on how to prevent cracks. Recently I shared two easy homemade air dry clay recipes here - a baking soda clay, and a glue and cornstarch clay. This week let's explore some creative and fun ways to make air dry. While the salt does an excellent job of preserving the salt dough itself, sealing the ornaments will help keep all the decorations you just lovingly applied looking great for years to come. I like to use spray poly , but coating each one in a thin layer of Mod Podge would also do the trick.
So that’s going to wrap it up for this special food better than salt dough holiday ornament clay recipe. Thanks so much for your time. I am confident you can make this at home. There’s gonna be interesting food at home recipes coming up. Don’t forget to bookmark this page on your browser, and share it to your loved ones, friends and colleague. Thank you for reading. Go on get cooking!